Sending SMS
Overview
New SMS /Broadcast SMS
| 1. |
Click on Broadcast SMS shortcut icon.
|
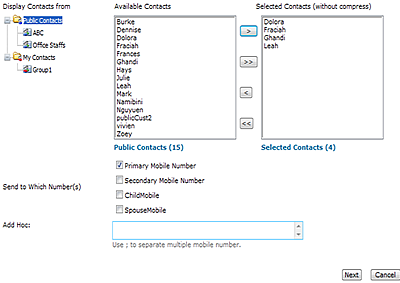
| 2. | Choose the type of group or individual contacts that you want. |
| 3. | Select your contacts and use the arrows to move them to the Selected Contacts box. To select or unselect multiple Contacts, click Ctrl + Click or Shift + Click. |
| 4. | Select the type of numbers you want to send to. The default is Primary Mobile Number. |
| Tips: Secondary Mobile number may be used if your contact has more than 1 number. In case your message is meant for both of his/her numbers, you can check on both the Primary & Secondary number and the system will broadcast to both. | |
| 5. | For Contacts not listed in the list, you can type in the mobile number in the Ad Hoc textbox provided. |
| 6. | Click Next button to move to the next page. |
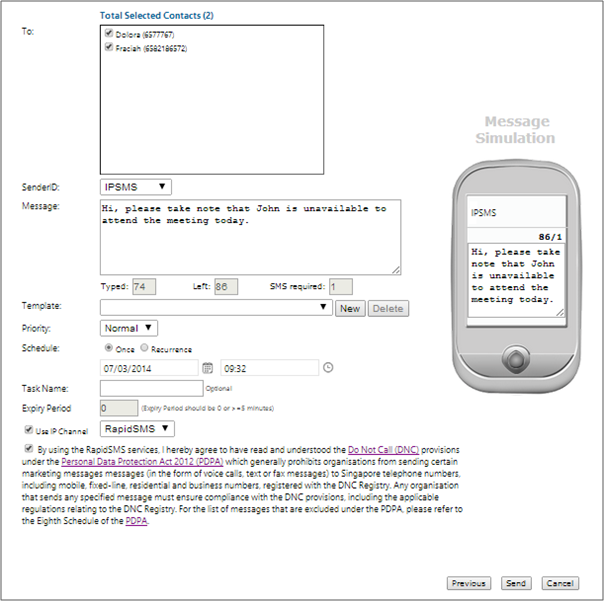
| 7. | Notice the To: list has been filled with the contact's name & mobile number. |
| Tips: You can remove some contacts and numbers from this list if you decide not to send to them. This list also shows no duplicate of data (in case you may have selected multiple contacts in the previous page) | |
|
8. |
You choose select the SenderID of your choice so the message sent out will bear this SenderID. Your SenderID are either your Mobile Number or the SenderID defined in Your Profile. |
|
9. |
You can choose to type in your message or select from an existing template message. |
| Tips: Your message can be customised to your contact's name if you put ##Name## in your message textbox. E.g. "Dear ##Name##, Our shop is having a promotions..." Your message will be translated to "Dear John Tan, Our shop....";where John Tan is stored in your contact's name. | |
| 10. | Skip this step if you don't need to use template. For first time user, there may not be any personal template for you to select.You can create your own template. You may also select from any ready Public Templates that are created by your administrator. |
|
On the New SMS view, you can select the corresponding
New or Delete function. (a) For creating new template, the procedures are as follows: 1. Click on New button. 2. Type in your template message. 3. Click on Save button. (b) For deleting template, the procedures are as follows: 1. Select the template to remove. 2. Then, click on Delete button. |
|
| 11. | Schedule - default value is NOW. |
| Note: If you want to schedule message for later delivery, please pick a date/time from the calendar icon. For recurrence type of SMS please refer to New Reminder . | |
| 12. | Task Name is optional. You can input a name. In the future, if you wish to filter your sent items, you can use this Task Name. If you leave it blank, the system will auto-generate an ID for this broadcast job. |
| 13. | Optional: Click on the Use IP Channel checkbox and select the IP-SMS channel from the list of channels available to you in order to send the message as an IP-SMS. |
| Note: If the intended recipient does not have the RapidSMS mobile app installed, they will receive the message as an SMS. | |
| 14. | Click on Send SMS button. |
| 15. | Check your Outbox for the pending delivery SMS. Once it is sent, it will appear on the Sent Items. If you cannot find it on the Sent Items, it may have been undelivered. |
New Reminder
| 1. |
Click on New Reminder shortcut icon.
|
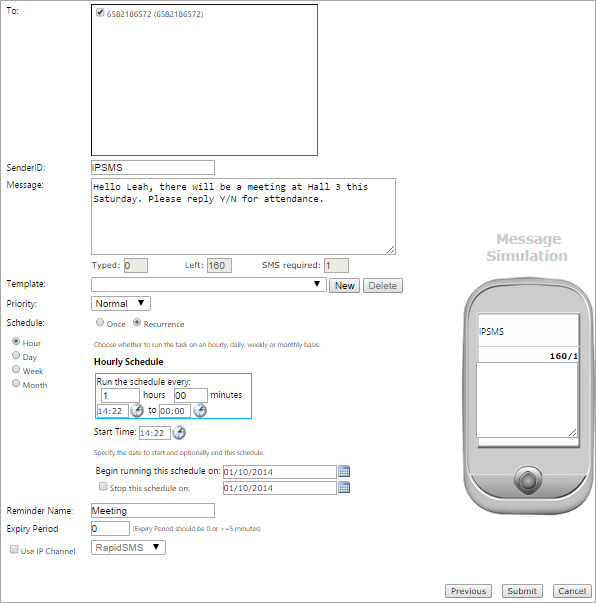
| 2. | Follow the same steps 2 to 9 at New SMS above. |
| 3. | Besides you can put ##Name## in message which can be customised to your contact's name (mentioned in New SMS step 8 tips); you also can put ##DateTime## in the recurrence message which will be replaced by the SMS sent date time to indicate when the SMS was sent. |
| 4. | Ensure the schedule type Recurrence is selected. |
| 5. | Choose whether to run the task on an hourly, daily, weekly or monthly. The default is Hourly. |
|
6. |
Configure the schedule detailed settings. |
| Tips: If you choose Hourly schedule, you can choose the time range for operation hour which means only the SMS schedule time is within the range will be sent. The default is 00:00 to 23:59. | |
| 7. | Choose the start time for the recurrence task. The default value is NOW. |
| 8. | Choose the begin date for the recurrence task to run. It's optional to choose an end date for it. |
| 9. | Give the task a unique name as identify ID. |
| Tips: You can easily find all SMS related to a particular reminder task from Outbox/Sent Items by Reminder Name. | |
| 10. | Optional: Click on the Use IP Channel checkbox and select the IP-SMS channel from the list of channels available to you in order to send the message as an IP-SMS. |
| Note: If the intended recipient does not have the RapidSMS mobile app installed, they will receive the message as an SMS. | |
| 11. | Click on Submit button. |
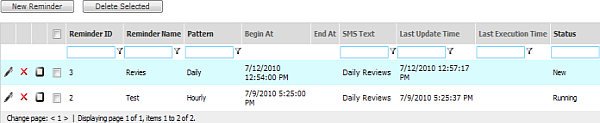
| 12. | Check all your existing reminders in the Manage Reminders view in the Message History menu. You are allowed to Edit, Disable or Delete reminder(s) there. |
 |
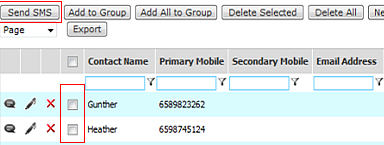
New SMS By Contact
| 1. |
Select the checkbox beside the Contact that
you want to send and click Send SMS button.
|
| 2. |
You can select Multiple Contacts
|
| 3. | Then, you will be redirected to the Send SMS/Broadcast SMS Page |
Broadcast to Group
Quick SMS
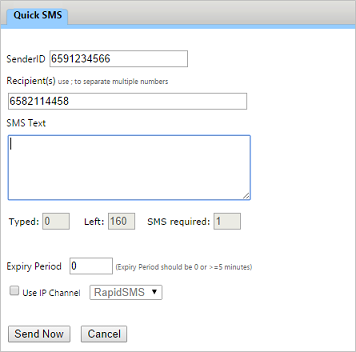
| 1. |
Go to My Contacts > Manage Contacts
(or click on Contacts Mgt shortcut icon  ) )
|
| 2. |
Click on the
icon
|
| 3. | A Quick SMS Interface will appear. |
| 4. | Type in your SMS Text. |
| Tips: Your message can be customised to your contact's name if you put ##Name## in your message textbox. E.g. Dear ##Name##, Our shop is having a promotions... Your message will be translated to Dear John Tan, Our shop.... where John Tan is stored in your contact's name. | |
| 5. | Optional: Click on the Use IP Channel checkbox and select the IP-SMS channel from the list of channels available to you in order to send the message as an IP-SMS. |
| Note: If the intended recipient does not have the RapidSMS mobile app installed, they will receive the message as an SMS. | |
| 6. | Click the Send Now button. |
| Note: Quick SMS cannot be scheduled. If you wish to add more recipients in the quick SMS, you need to type in the mobile number and use ; semicolon to separate the numbers. |
Batch SMS
Batch SMS is a very useful for 2 purposes:
a) Sending customised contents with a mail merge feature
b) Broadcasting to large group of recipients that are from external list
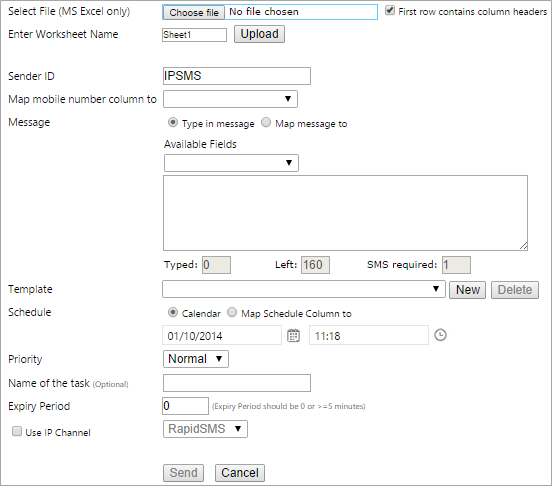
| 1. |
Click on Batch SMS shortcut icon.
|
| 2. | Select the filename (Microsoft Excel) & click Upload button |
|
To upload your filename, please: a) Browse the file. b) Select the file and click Upload button. c) Your uploaded file will be automatically be inserted into the textbook. |
|
|
|
| 3. | A table of data will be displayed on the page (similar to your data in your excel file) and limited by 10 records per page. |
| 4. | Select the map mobile number column to e.g. Mobile (if your list of mobile numbers in your imported file are listed under the data header name, Mobile). |
| 5a. | Type in your message in the text box below. You can customised your message by selecting from the "available fields" in the listbox. Each time you select a field, it will be added to the end of your message. e.g. Dear ##Name## where ##Name## refers to the Header name in your Excel file. |
| Tips: You can preview your customised message by clicking on the preview button on the simulator phone to see the message to the first recipient. | |
| 5b. | Alternatively, select the Map Message to e.g. Message (if your list of SMS messages in your imported file are listed under the data header name, Message). |
| 6. | Skip this step if you don't need to use template. For first time user, there may not be any personal template for you to select. You can create your own template. You may also select from any ready Public Templates that are created by your administrator. |
|
On the New SMS view, you can select the corresponding New
or Delete function. (a) For creating new template, the procedures are as follows: 1. Click on New button. 2. Type in your template message. 3. Click on Save button. (b) For deleting template, the procedures are as follows: 1. Select the template to remove. 2. Then, click on Delete button. |
|
| Note: If your template contains symbols like ## before and after the text, it means these are fields that need to be merge. Check that these name correspond with your column name in your Excel file. The best way to check the content is by clicking on the Preview button on the simulator phone to see that the content is merged correctly. | |
| 7. | Schedule - default value is NOW. You can choose to schedule your message at a later date/time or ignore to take the current time. If you have customised your date/time in an Excel file for each individual recipient, you can also Map Schedule Column to e.g. Time of Delivery |
| 8. | Task Name is optional. You can input a name. In the future, if you wish to filter your sent items, you can use this Task Name. If you leave it blank, the system will auto-generate an ID for this broadcast job. |
| 9. | Optional: Click on the Use IP Channel checkbox and select the IP-SMS channel from the list of channels available to you in order to send the message as an IP-SMS. |
| Note: If the intended recipient does not have the RapidSMS mobile app installed, they will receive the message as an SMS. | |
| 10. | Click on Submit button. |
| 11. | Check your Outbox for the SMS. Once it is sent, it will appear on the Sent Items. |
Quick Forward

| 1. | Go to Inbox or Sent Items view page. |
| 2. |
Click on the icon |
| 3. | A Forward SMS Interface will appear. |
| 4. | Choose the mobile number from existing contact list or choose new to type the number you wish to forward to. |
| 5. | Amend the original SMS text if needed. |
| 6. | Optional: Click on the Use IP Channel checkbox and select the IP-SMS channel from the list of channels available to you in order to send the message as an IP-SMS. |
| Note: If the intended recipient does not have the RapidSMS mobile app installed, they will receive the message as an SMS. | |
| 7. | Click the Send Now button. |
| Note:Forward SMS cannot be scheduled. If you wish to add more recipients in the forwarding SMS, you need to type in the mobile number. and use ; semicolon to separate the numbers. |
Quick Reply
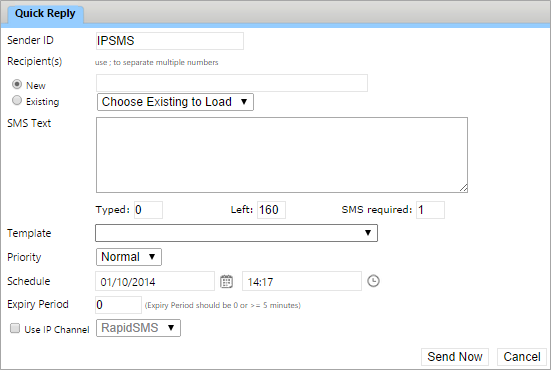
| 1. | Go to Inbox view page. |
| 2. |
Click on the icon |
| 3. | A Quick Reply Interface will appear. |
| 4. | The original SMS sender's mobile number will automatically loaded in the recipient field. If you wish to add more, you can use ; semicolon to separate the numbers. |
| 5. | Type in the reply message. |
| 6. | Optional: Click on the Use IP Channel checkbox and select the IP-SMS channel from the list of channels available to you in order to send the message as an IP-SMS. |
| Note: If the intended recipient does not have the RapidSMS mobile app installed, they will receive the message as an SMS. | |
| 7. | Click the Send Now button. |
| Note:Forward SMS cannot be scheduled. |