Contact Management |
|
OVERVIEW |
| This Section will help you to Add, Import, Group, Manage,
Search Contacts & Manage Groups |
| |
DEFINITION OF PUBLIC & PRIVATE CONTACTS |
RapidSMS is a web-based solution where each individual user
can manage his contacts. In a corporate environment, Public contacts becomes
very useful so that contacts need not be replicated again by individuals.
Private Contacts: Contacts that are created by the individual are
always stored in the Private contacts. The user can always edit and delete
his/her own private contacts.
Public Contacts: The Administrator manages the Public contacts. Contacts
and the Groups that are found in the Public contacts can be used by all
the users in the RapidSMS. General users can only view and categorise public
contacts under their own Private groups and they cannot delete any Public
contacts. However, if the Administrator has deleted a Public contact, the
same contact will be removed from an end user's private group. |
|
|
ADD
CONTACTS |
| Add Contacts individually |
|
| You can add contacts by adding individually or by importing.
This section illustrates how you can add a contact individually. |
| |
|
|
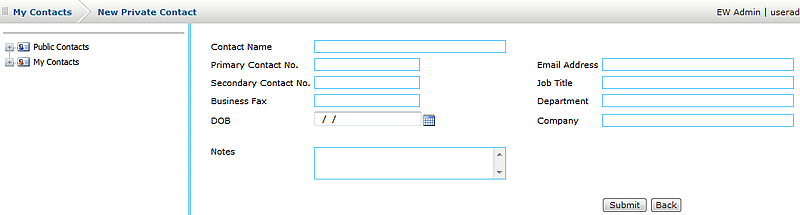
1.
|
Click on My Contacts on the left menu.
In the page, click on the New Contact button.
(or click on New Contact shortcut icon  )
) |
| 2. |
Type in the necessary information. |
| |
Note: Contact Name and Primary
Contact No. are
mandatory fields. |
| 3. |
Click on Submit button. |
| |
Note: To continue adding another contact,
click on Add Another button. |
| 4. |
Go to the My Contacts view to check out
for the newly added contacts. |
| 5. |
To group the contacts, go to the Manage Group
section |
|
|
Import
Contacts |
| |
|
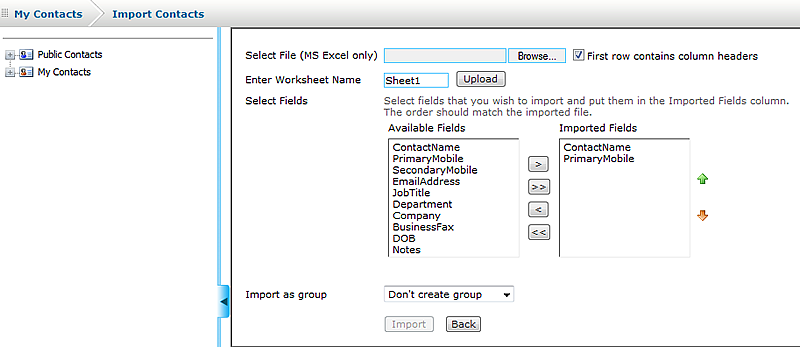
| 1. |
Go to My Contacts > Import Contacts
button. |
| 2. |
Browse for the Microsoft Excel file and indicate the
worksheet. |
| |
Note: You can change the worksheet name
from Sheet1 to other names you have specified in your Excel file.
Only Microsoft Excel (97 - 2010 version) file format is acceptable
for the import function. |
| 3. |
Click on Upload button. |
| 4 |
Select the fields you want to import. |
| |
Note: The order of the fields you will
specify should relate to the order of the columns in your Excel file.
If you have 5 columns in your Excel file, you need to specify 5 fields
to be used. ContactName & PrimaryMobile are mandatory
fields. |
| 5. |
Select the group
type to be imported. |
| |
If you don't wish to import the numbers
into any groups, leave it as Don't Create group. You can also import
the contacts into an existing group by selecting the groupname or
import to a new group and specify a name. |
| 6. |
Then, click on Import button. |
7.
|
When you check the My Contacts page, you should
see the contacts. Similarly, if you have specified a group for this
import, you can find the group with these contacts. |
| |
|
|
|
MANAGE
CONTACTS
|
| You can edit, delete, search and group
the contacts. This section will cover the Edit, Delete & Search functions. |
| |
| Editing Contacts |
|
|

| |
|
| 1. |
Go to My Contacts > Import Contacts
button. |
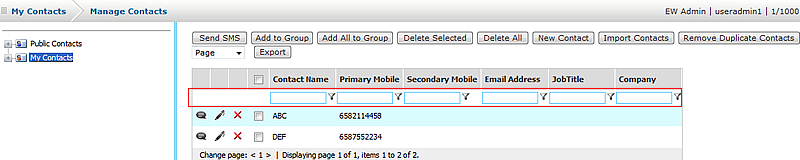
| 2. |
Go to the name you wish to edit & click on the
Edit icon  . .
|
| |
If the contact list is too long, you can
use filter or sort the contacts to find it. |
| 3. |
The procedure is similar to adding a new contact. Make
the necessary changes and click on Update contact button. |
| |
|
|
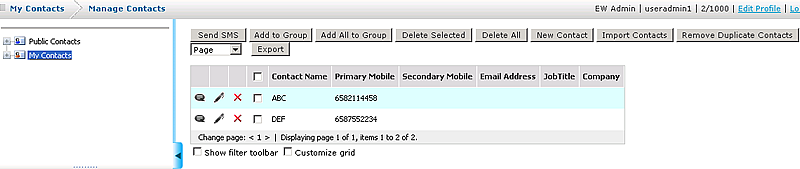
| Deleting Contacts |
| 1. |
Go to My Contacts. |
| 2. |
Go to the name you wish to delete & click on the
Delete icon  .
The system will prompt you before it confirms to delete. .
The system will prompt you before it confirms to delete. |
| |
Note: Once the contact has been deleted,
the name will be removed from all the groups it has earlier been associated
with. |
|
|
| Multiple Deletion |
| 1. |
To delete multiple contacts, use the checkboxes corresponding
to the Contact Name. |
| 2. |
Click on Delete Selected button. The system will
prompt you before it confirms to delete. |
| |
Note: Once the contacts have been deleted,
the names will be removed from all the groups it has earlier been
associated with. |
| |
|
| |
|
| Searching Contacts |
| |
 |
| |
|
| 1. |
Select one of the parameter you wish to filter. e.g.
Contact Name Contains |
| 2. |
Input the value in the text box & click the Filter
icon. There are few types of filtering criteria you can choose from.
The easiest one would be "Contains". |
3.
|
Another way to find is to Sort the header name by ascending
or descending order. This is done by clicking on the header (Once
for ascending) & (Twice for descending). |
| 4. |
To remove the Sort function, select the My Contacts
from the navigation menu to refresh the page or in the filter function,
select Remove Filter. |
|
Note: When performing the filter, you
can filter by multiple fields e.g. You can filter by company and filter
by contact name. In this way, your filter criteria contain 2 criteria.
This is useful if you need to search across huge set of data. |
| |
|
| Remove Duplicate Contacts |
1.
|
Duplicate refers to duplicated primary mobile number.
When importing contacts, you may have accidentally upload the contact
and his mobile number multiple times. |
| 2. |
The duplicated numbers are displayed in this view when
you click on the Remove Duplicate Contacts button. |
| |
|
|
|
MANAGE
GROUPS
|
| This section illustrates how you can create, edit
and delete groups. |
| |
| Create Groups |
| Groups can be created during an import contacts
process or by selecting contacts to create a new group. This section illustrates
the latter. |
| |
|
| 1. |
Go to My Contacts button. |
| 2. |
Select the Contacts by selecting the checkboxes next
to each contact name |
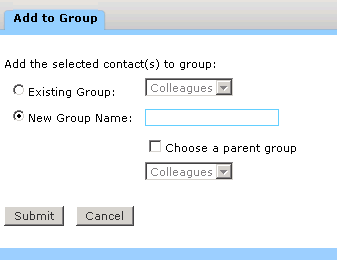
| 3. |
Click on Add to Group button. |
| 4 |
Choose New Group Name and type in your desired
group name. |
| 5. |
Click on Submit button.
|
| |
Note: If you are adding contacts to an
existing group, at Step 4, select Existing Group and select
a name from the list. |
| |
|
| Sub Groups |
| 1. |
When creating a group, you'll notice an option to Choose
a parent group. |
| 2. |
RapidSMS allows you to create sub-groups and does not
restrict the number of sub-groups & the subsequent levels. |
| 3. |
Sub-group is very useful as it saves a lot of time trying
to put different groups into a main group. A classic illustration
would be a school. |
| e.g. |
Level 1 comprises of 5 classes. You should first create
a group name called Level 1. |
| |
Then you create the classes like 1A, 1B, 1C under the
parent group of Level 1 |
| |
During a broadcast, you do not need to select 1A, 1B,
etc but only select Level 1 |
| |
|
| Add All to Group |
| 1. |
The select checkbox method will be tedious if you need
to go to various pages to keep repeating the same process of "add
to group". |
| 2. |
You can filter the contacts and click on Add All
to Group button |
| 3. |
All the pages of contacts will be added together to
the group name you've specified. |
| |
|
| Removing contacts from the Group |
| 1. |
Select & expand My Contacts. |
| 2. |
Go to the Groupname. |
| 3. |
Click on the Remove from group icon  on the name you wish to remove.
 |
| 4. |
For multiple names removal, check the names and click
on the Remove Group button. |
| |
|
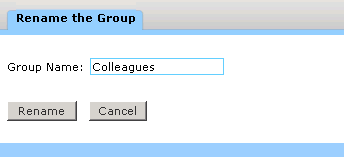
| Rename Group |
 |
| |
|
| 1. |
Select & expand My Contacts. |
| 2. |
Go to the Groupname. |
| 3. |
Click on Rename Group button. |
| 4. |
Type in the new group name and click on Rename
button. |
| |
Note: To exit without renaming, click
on cancel button |
| |
|
| Delete the Entire Group |
| 1. |
Select & expand My Contacts. |
| 2. |
Go to the Groupname. |
| 3. |
Click on Delete Group button. You will be prompted
to confirm your action before the group has been deleted. |
| |
Note: Contacts still remain in My Contacts
except the group has been removed. |
| |
|
|
|
BROADCAST
TO GROUP |
| |
|
| 1. |
Go to My Contacts. |
| 2. |
Select & expand My Contacts. |
| 3. |
Go to the Groupname |
| 4. |
Click on Send SMS button. |
| 5. |
Type in your message or select from an existing
template message to insert the message to be sent. |
| |
For first time user, there is no template
for you to select. Please create your template first. |
| 6. |
Schedule - default value is NOW. |
| |
Note: If you want to schedule message
for later delivery, choose a date/time from the calendar. |
| 7. |
Task Name is optional. You can input a name. In the
future, if you wish to filter your sent items, you can use this Task
Name. If you leave it blank, the system will auto-generate an ID for
this broadcast job. |
| 8. |
Click on Send SMS button. |
| |
Note: The possible status are P=Pending,
S=Successful, R=Received, F=Failed. |
| |
|
| |
See other ways to send SMS. |
|
|
| |