Configure Application Settings
OVERVIEW
This Section will guide the Administrators to configure the Application Settings to the preferance of your organisation.
For EW Administrator, Go to Admin > Manage Application Settings
For super Administrator, Go to Manage > Application Settings >
Select the Company in the Left panel
DEFAULT COUNTRY CODE FOR MOBILE NUMBER VALIDATIONS
| CountryCode : | The default country code (e.g. Singapore is 65) |
| NationalMobileNoRegex: | Configure the regex expresiion for the client national mobile numbers. (e.g. Singapore regex expression is "^(8|9)\d{7}$") |
| AllValidMobileNoRegex : | Configure the regex expression for all the nationals to allows SMS to send. (e.g send SMS to india and singapore regex expression is "^91(8|9)\d{9}$|^65(8|9)\d{7}$") |
| Test Regex Expressions : | Login as Administrator > Go to Admin menu > Click Check Mobile Numbers menu item Using the below screen user can test regex expressions for the above settings. 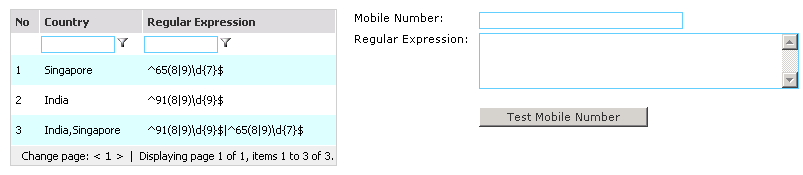 |
|
Seq.
|
Senario
|
Action
|
|
1.
|
Non numeric value (i.e. space, +, alphabet) | Remove non numeric values |
|
2.
|
Mobile Number Start with '00' | Eliminate '00' |
|
3.
|
Mobile Number Start with '0' | Eliminate '0' and append default Country Code in front. |
|
4.
|
Mobile Length equals the Default National Number Length AND Mobile Number starts with one of the national number prefix | Append the default Country Code in front. |
|
5.
|
Unmatched 2-4 scenario | No action to take. |
Note: Country code change will have effect on next time log-in.
SPAM CONTROL
Spam control automatically log unsubscribed mobile numbers and filter out unsubscribe numbers before sending SMSs. Click here to know how spam control works.
Note: The SMS deliver status value flag as "U" in Sent Items, if the recipient mobile number is in unsubscribe number list and the message will not be delivered.
| SpamControlOn : | Indicate turn on/off spam control. Y: Turn on spam control. N: turn off spam control. The default value is Y. |
| UnsubscribeKeyword : | The SMS unsubscribe keyword value. |
| SubscribeKeyword : | The SMS re-subscribe keyword value. |
| UnsubscribeAutoReplyOn: | Indicate whether there is a need to send an auto-reply message to the unsubscribe user. Y: turn on SMS auto reply for unsubcription. N: turn off SMS auto reply for unsubscription. |
| UnsubscribeAutoReply: | Unsubscribe auto- reply message |
| SubscribeAutoReplyOn: | Indicate whether there is a need to send an auto-reply message to the subscribe user. Y: turn on SMS auto reply for subcription. N: turn off SMS auto reply for subscription. |
| SubscribeAutoReply: | Subscribe auto- reply message |
OPERATING HOUR
All messages (except unsubscribe auto reply) will only be delivered within the operation hour period. Default value is from 0000 to 2359.
| OperatingFrom: | Operating hour begin with (hhmm). Default value is 0000. |
| OperatingTo: | Operating hour end with (hhmm). Default value is 2359. |
Note: Operating hours change will have effect on next time log-in.
| Route Incoming SMS using Remote Broadcast SMS | |
| Description : | The system can route incoming SMS by using remote broad cast setting. It means that when incoming SMS starts with remote broadcast SMS keyword this incoming SMS fires to send outgoing SMS to all recipients in a particular his Private/Public Group. This was happens when the Remote Broadcast SMS setting is turn on. Assume user want to send SMS without log into application, he can send one incoming SMS which starts with Remote Broadcast keyword and then space and then group name and then SMS text he want to send. This incoming SMS will send outgoing SMS to all the recipients inside that particular group and also send the notification SMS to user. |
| Add Value | RemoteBroadcastSMSOn |
| Default Value : | N |
| Configuration Options: |
Y or N |
|
|
|
| Remote Broadcast SMS Keyword | |
| Description : | Keyword to identify whether the Incoming SMS matches the Remote Broadcast SMS Criteria. |
| Add Value | RemoteBroadCastSMSKeyword |
| Default Value : | Remote |
| Configuration Options: | Any keyword name |
| Default SMS Quota | |
| Description : | Quota can be set to restrict the users from abusing and "oversending" SMS at the expense of the organisation's cost (as each SMS cost a few cents). The administrator can set a desirable default quota so each time he creates a user, the Quota field will be auto fill with this default value. |
| Add Value | DefaultSMSQuota |
| Default Value : | 0 |
| Configuration Options: |
0 or any integers >1 |
|
|
|
| Reset Quota option | |
| Description : | RapidSMS allows the administrator to set usage quotas for the end user. This function defines if you like to restrict the quota reset to be a manual reset by the administrator or an autoreset by the system. |
| Add Value | AutoResetQuota |
| Default Value : | N |
| Configuration Options: | Y or N Y means when user hit the SMS quota, he can still can send out messages, and the SMS counter auto reset. N means user cannot send SMS anymore when hit the quota unless Admin reset for him. An email will send to Admin when user hit the SMS quota |
| Domain Suffix | |
| Description : | Whenever there is an incoming SMS, the system can route the SMS to the correct user's email address. The Sender's Email will appear as mobilenumber@yourcompany.com e.g. 6590033008@inspire-tech.com. You can change the domain suffix to your company's domain. |
| Add Value | DomainSuffix |
| Default Value : | @smssrv.com |
| Configuration Options: | It is recommended to change the value to @yourcompanyname.com |
|
|
|
| Route Incoming SMS Via Short Code | |
| Description : | The system can route incoming SMS by different logic. One of them is by identifying a user shortcode. Take for example, John Tan's short code is JT. Whenever someone sends a message with JT in front (JT I am responding to your earlier msg...), it will be routed to John Tan's Inbox and Email address. You can enable or disable this function. To understand the Inbox Rule please click here. |
| Add Value | IncomingRouteViaShortCode |
| Default Value : | N |
| Configuration Options: | Y or N Y - Enabling this function will allow the system to route an incoming SMS that has a user shortcode to the particular user Inbox. N - If you disable it, the user short code is redundant. |
|
|
|
| Default Sender ID | |
| Description : | Outgoing messages can have a sender ID masking/customisation. Typically an organisation will use the company's name or acronyms for the sender ID so the message can be associated with the company. However, this applies only if you use SMPP or VGSM in EEMS2007. |
| Add Value | DefaultSenderID |
| Default Value : | InspireTech |
| Configuration Options: | If you use SMPP or VGSM, please change it to your preferred SenderID, use ; for multiple sender id. The sender cannot exceed 11 characters. If you are using GSM modem, this step is not required. |
|
|
|
| User's control on Sender ID | |
| Description : | This is related to the above configuration on DefaultSenderID. RapidSMS is developed with the flexibility for organisations to decide whether to restrict the SenderID control to only the administrators or allow end users to define their own preferred SenderID. Similarly, this section is applicable if you are using SMPP & VGSM in EEMS2005. For GSM modem users, please choose Restrict. |
| Add Value | CustomSenderIDRule |
| Default Value : | UserDefine |
| Configuration Options: | Database, UserDefine or Restrict (Replace the
default value with either Database, UserDefine or Restrict.) Definition: Database - Look up the SenderID(mobile/senderID) from User table; Typically when you create the user, you would have decided the "selectable" sender ID for the user by defining a SenderID and mobile number for the user. When the user sends out the SMS, he can choose to display the message as the Sender ID or his own mobile number. The user is not able to change the sender ID without requesting a change from the administrator. UserDefine - Turn on SenderID for users to define; Users have the flexibility to type whatever name they want (subject to the limitation of number of characters). Though all SenderID used by the users will be recorded in the Sent Items, it is important for the organisations to know that such flexibility does expose a risk of end user abusing their rights to create "unauthorised spams" with a masked ID to impersonate another company or mobile number. This option is typically not recommended unless the organisation trust the users to be responsible in the use of this function. Restrict - Turn off custom senderID and use Default SenderID value. Use this value if you are using GSM modem or you do not wish the users to select or define their own senderID. With this option turned on, all outgoing messages will take your DefaultSenderID. |
| Additional Mobile Number Fields | |
| Description : | RapidSMS allows organisations to create additional
fields in the Contacts Information. Take for example, a school may
want to have additional field name like Class Name, Father's Name
& Father's Mobile, etc under one contact. In order to be flexible
to create new fields without customising the application, organisations
just need to configure them here. (See illustrations below) |
| Add Value | Field1 - Field5 |
| Default Value : | ClassName, etc |
| Configuration Options: | Field1 to Field5 are
additional fields that can be enable in application settings for
each company if you need to store additional
information about the Contacts. It up to your organizational policy
to enable it or not. To configure this, you need be an administrator of your company. |
|
|
|
| Additional Mobile Number Field Names | |
| Description : | This is related to Additional Fields. Assuming you
have enabled Field1 & Field2, one of them is supposed to be
a mobile number, you need to indicate here that Field 2 is supposed
to be used as mobile number. The system will intelligently assign
a mobile number characteristics to this field. (See illustrations
below) |
| Add Value | AddtionalMobileNoFields |
| Default Value : | |
| Configuration Options: | To configure this, you need be an administrator of your company. |
|
|
|
| Sample configuration change for Contact view & Additional Fields: | |
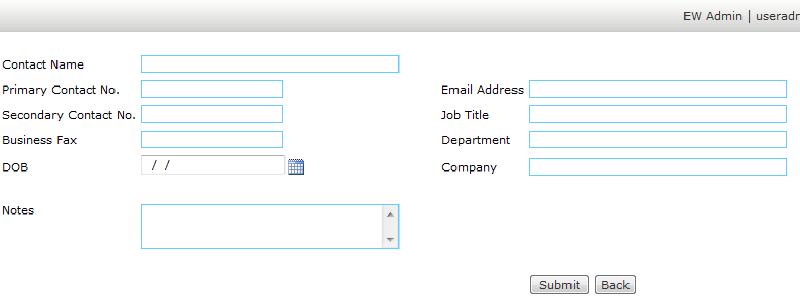
| Step1: Before web.config changes The New Contacts Input screen would only show the default fields (Contact Name, Primary Contact No, Secondary Contact No, Business Fax, DOB, Notes, Email Address, Job Title, Department, Company) |
|
 |
|
|
Step 2: Changes made to web.config <add key="Field1" value="Pay
Grade"/> |
|
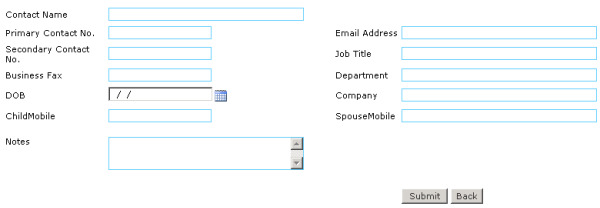
| Step 3: After the web.config changes
The New Contacts Input screen would also show the default fields & the additional Fields (Pay Grade, Spouse's Number & Child's Number) |
|
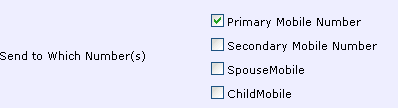
| When you indicated Spouse Mobile & Child Mobile as Mobile Fields it will be display in the Send SMS Interface for the user to select. |
 |
| Description: | |
| There are a lot of data fields in Contacts information, a grid view may not be able to display all of them due to the limitation of the width of the screen. RapidSMS allow administrator to decide which data fields are important and would be shown in the contacts view. |
|
|
|
|
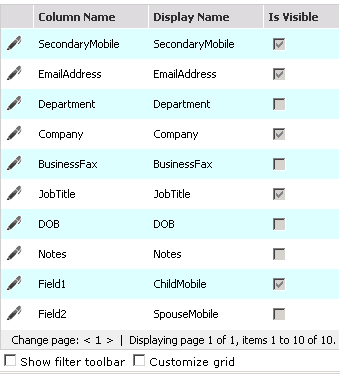
| Configure in Admin section on the web page | |
|
Assumed you had added 1 additional fields (e.g. Field 1: ClassName)
and would like to display this data field in the contacts view.
You can go to Admin> Customize Contacts View secion,
and click on edit icon |
|
|
|
|
| After configuration changes | |
| In the contacts view datagrid, the end user could see additional Fields (Class Number) is shown and the some of the default fields are hide (e.g. Notes, business fax). | |
 |
|
| Show Unassigned Incoming SMS to user | |
| Description : | Detect whether system need to display the Unassinged Incoming SMS to user. If set the value is true system display all Unassigned Incoming SMS to user but user can see this SMS he can't reassign to any other user. |
| Add Value | ShowUnAssignedItems |
| Default Value : | N |
| Configuration Options: |
Y or N |