Public Contact Management |
|
OVERVIEW |
| This section will help you to Add, Import, Group, Manage,
Search Public Contacts |
| |
|
What is a Public Contact ?
A Public Contact is a Contact that All Users can access and use for
their messaging purpose. Public Contacts can only be added & deleted
by the Administrators. General Users can only add & remove Public
contacts from their Personal Groups. However, they cannot delete
these Public Contacts from the Public Group.
|
|
|
ADD PUBLIC
CONTACTS |
|
| Add Contacts Individually |
| |
|
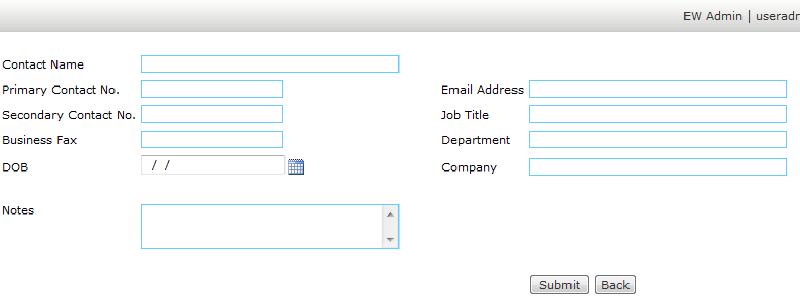
| 1. |
Go to Public Contacts. |
| 2. |
Click on the New Contact button. |
| 3. |
Type in the necessary information. |
| |
Note: Contact Name and Primary Contact No. are
mandatory fields. |
| 4. |
Click on Submit button. |
| |
Note: To continue adding another contact,
click on Add Another button. |
| 5 |
Go back to the Manage Public Contacts view to check
the newly added contact. |
| |
|
|
|
| Import
Contacts |
| |
|
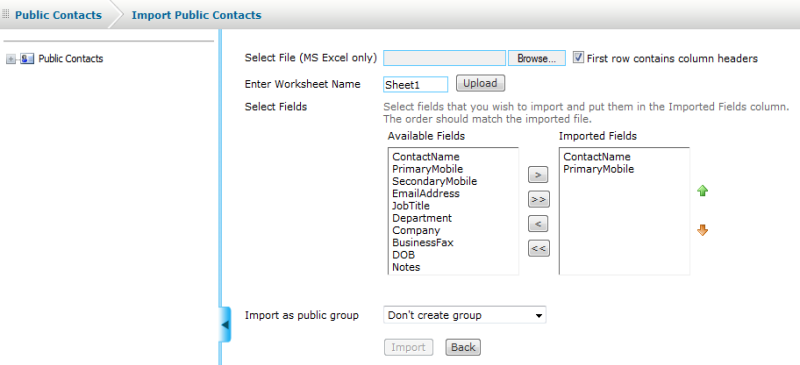
| 1. |
Go to Public Contacts > Import Contacts
button. |
| 2. |
Browse for the Microsoft Excel file and indicate the
worksheet. |
| |
Note: You can change the worksheet name
from Sheet1 to other names you have specified in your Excel file.
Only Microsoft Excel file format is acceptable for the import function. |
| 3. |
Click on Upload button. |
| 4 |
Select the fields you want to import. |
| |
Note: The order of the fields you will
specify should relate to the order of the columns in your Excel file.
If you have 5 columns in your Excel file, you need to specify 5 fields
to be used. ContactName & PrimaryMobile are mandatory
fields. |
| 5. |
Select the group
type to be imported. |
| |
If you don't wish to import the numbers
into any groups, leave it as Don't Create group. You can also import
the contacts into an existing group by selecting the groupname or
import to a new group and specify a name. |
| 6. |
Then, click on Import button. |
7.
|
When you check the Manage Public Contacts page,
you should see the contacts. Similarly, if you have specified a group
for this import, you can find the group with these contacts. |
| |
|
|
|
MANAGE
PUBLIC CONTACTS |
|
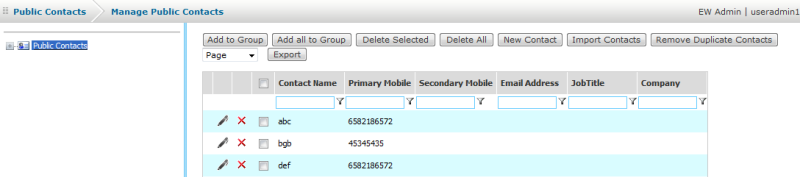
| You can edit, delete, search and group
the contacts. This section will cover the Edit, Delete & Search functions. |
| Editing Contacts |
|
|

| |
|
| 1. |
Go to Public Contacts. |
| 2. |
Go to the name you wish to edit & click on the
Edit icon  . . |
| |
If the contact list is too long, you can
use filter or sort the contacts to find it. |
| 3. |
The procedure is similar to adding a new contact. Make
the necessary changes and click on Update contact button. |
| |
|
|
| Deleting Contacts |
| |
|
| 1. |
Go to Public Contacts. |
| 2. |
Go to the name you wish to edit & click on the
Delete icon  .
The system will prompt you before it confirms to delete. .
The system will prompt you before it confirms to delete. |
| |
Note: Once the contact has been deleted,
the name will be removed from all the groups it has earlier been associated
with. |
| |
|
| Multiple Deletion |
| |
|
| 1. |
To delete multiple contacts, use the checkboxes corresponding
to the Contact Name. |
| 2. |
Click on Delete Selected button. The system will
prompt you before it confirms to delete. |
| |
Note: Once the contacts have been deleted,
the names will be removed from all the groups it has earlier been associated
with. |
| |
|
| Searching Contacts |
 |
| |
|
| 1. |
Select one of the parameter you wish to filter. e.g.
Contact Name Contains |
| 2. |
Input the value in the text box & click the Filter
button. |
3.
|
Another way to search is to Sort the header name by ascending
or descending order. This is done by clicking on the header (Once
for Ascending) & (Twice for Descending). |
| 4. |
To remove the Sort function, select the Public Contacts
from the navigation menu. |
|
|
MANAGE
PUBLIC GROUPS
|
| This section illustrates how you can create, edit
and delete groups. |
| |
| Create Groups |
| Groups can be created during an import contacts
process or by selecting contacts to create a new group. This section illustrates
the latter. |
|
| |
|
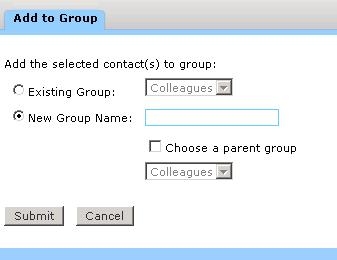
| 1. |
Go to Public Contacts. |
| 2. |
Select the Contacts by checking the boxes. |
| 3. |
Click on Add to Group button. |
| 4 |
Choose New Group Name and type in your desired
group name. |
| 5. |
Click on Submit button. |
| |
Note: If you are adding contacts to an
existing group, at Step 4, select Existing Group and select
a name from the list. |
| |
|
| Removing contacts from the Group |
 |
| |
|
| 1. |
Select & expand Public Contacts. |
| 2. |
Go to the Groupname. |
| 3. |
Click on the Remove from group icon  on the name you wish to remove.
 |
| 4. |
For multiple names removal, check the names and click
on the Remove from Group button. |
| |
|
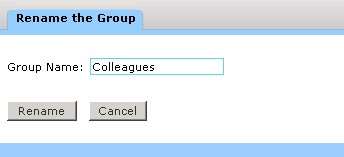
| Rename Group |
| 1. |
Select & expand Public Contacts. |
| 2. |
Go to the Groupname. |
| 3. |
Click on Rename Group button. |
| 4. |
Type in the new group name and click on Rename
button. |
| |
Note: To exit without renaming, click
on Cancel button |
| |
|
| Delete the Entire Group |
| 1. |
Select & expand Public Contacts. |
| 2. |
Go to the Groupname. |
| 3. |
Click on Delete Group button. You will be prompted
to confirm your action before the group is deleted. |
| |
Note: Contacts still remain in My Contacts
except that the group has been removed. |
| |
|
|
|
| |